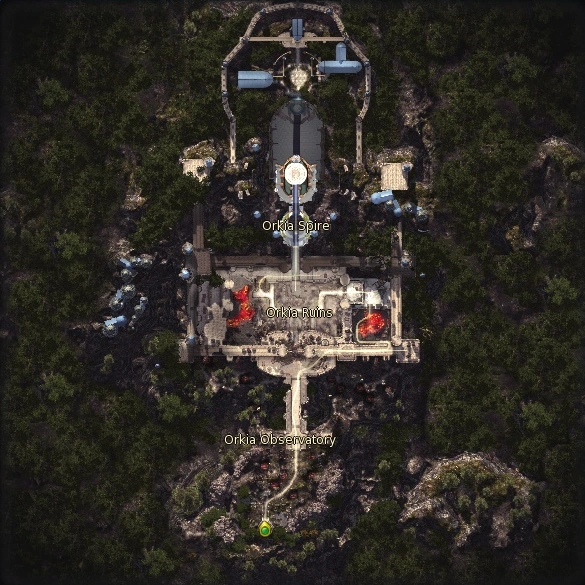
Fissure of Oblivion map
Fissure of Oblivion (FoO/Fissure) is a timed solo instance for players of level 66 and above, introduced in the 5.1 update. Ever since its release it has been hailed as one of the best current sources of experience in the game, making it an incredibly popular dungeon among players.
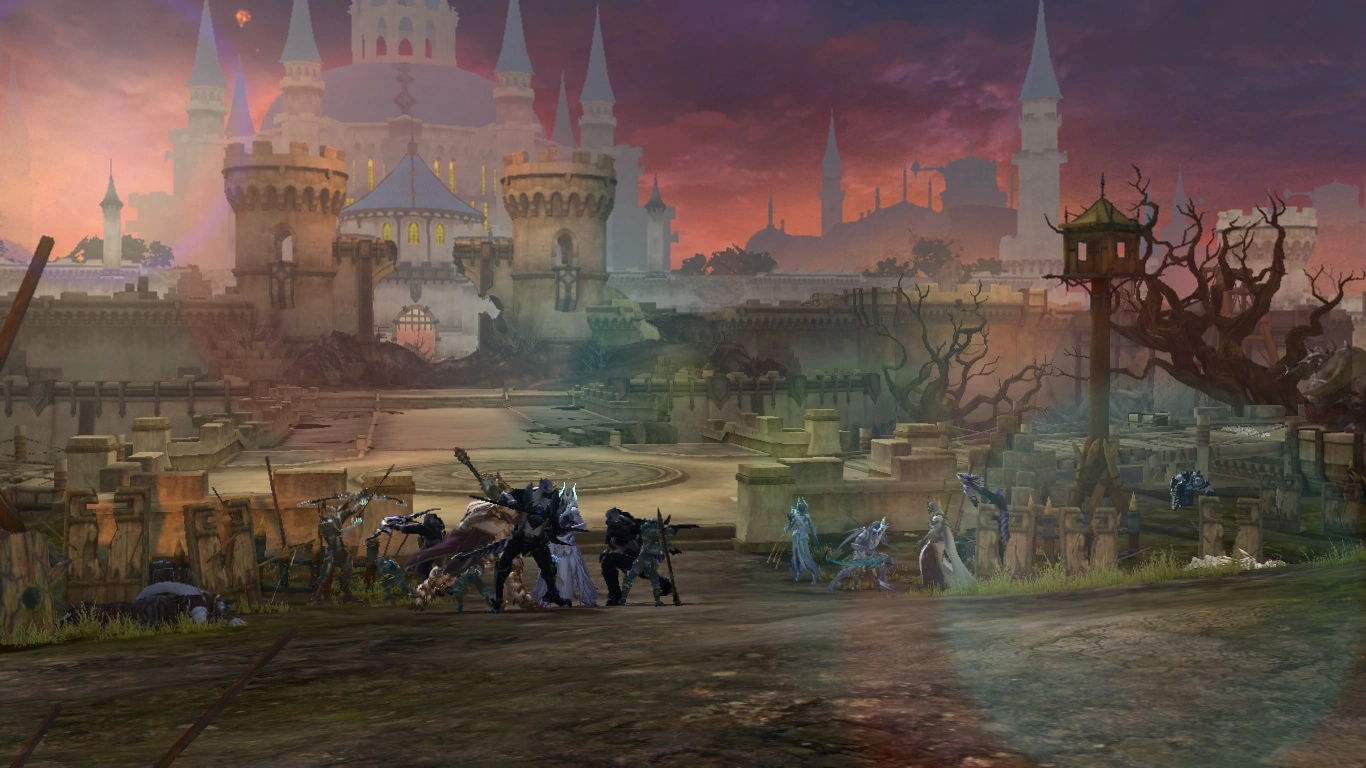
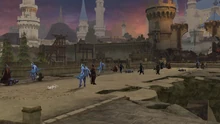
In this instance the player explores a part of his/her forgotten Archdaeva past, traveling into the memories of time to directly after the failed peace negotiations. The Balaur have just overrun an ancient Atreian stronghold, Orkia Fortress, and the player has to use the various Archdaeva transformations available to them to swath a way through the numerous Balaur hordes and reach top of the fortress, where the encounter with the final boss awaits.
Backstory

Aion OST - Rift of Oblivion
Lady Siel created the Fissure of Oblivion to store and protect the memories of the ancient Archdaeva. Using the memory of your past life, venture into the Fissure alone and transform into powerful ancient avatars. However, within the Fissure exists a <Shadow of Oblivion>, created by Siel herself to safeguard the memories from falling into the hands of the unworthy.
Access
The Fissure of Oblivion is accessible as soon as the player has reached level 66. The entrance can be found at the following locations:
Walkthrough
The instance can be ran in various ways with different objectives in mind. Generally, runs focus on XP or for rank. The former refers to killing the majority of mobs, while the latter will focus on doing the instance in the most efficient way. It is also possible to do a hybrid XP/rank run, which is what most players tend to settle for. In such runs the players clear the instance as if it were for rank, but also to maximize XP gains, while at the same time still gaining a B-rank.
During server XP events (and in combination with own XP boosts, such as charms, Teas of Repose, Berdin Stars, etc.) it is recommended to focus just on killing the aforementioned monsters and then exiting/re-entering via instance reset scrolls to maximize XP efficiency.
General
While inside the instance, the player will be transformed into the Ancient Archdaeva, enabling them to use the Elemental Transformations which are usually only available to level 75 players (and with a much longer cooldown) as well as the skills usually available for their class. However, during the effect of the transformation, only the form's skills can be used.
Effectiveness inside heavily relies on using the right element. Almost every mob is associated with a certain type, which is countered by one of the Archdaeva's own elements. The appropriate transformation results in additional damage.
 Warrior Type is countered by <Avatar of Wind>
- Mage Type is countered <Avatar of Fire>
- Special Type is countered by <Avatar of Water>
- Assassin Type is countered by <Avatar of Earth>
The mobs inside the instance will always be of the same level as the player, unless the player levels up during the run itself.
Run
Players will begin inside a small building, giving them 3 minutes to prepare. Once the door is opened, the 30 minute timer will begin. In case the player loses the ability to transform, they may reenter this room, refreshing their buff. While mob types are countered by elements, the most effective transformation is ![]() <Avatar of Fire> due to its fast damage and crowd control. As such, it is highly recommended to make use of this one when dealing with packs of Balaur.
<Avatar of Fire> due to its fast damage and crowd control. As such, it is highly recommended to make use of this one when dealing with packs of Balaur.
Platform
The player will begin in Orkia Observatory. In the path there will be guards battling a group of four Balaur, which must be killed so that those guards may move forward and fight the big pack of Balaur further in. On the sides of the path, there will be a <Recuperating Bakarma Gladiator> and a <Recuperating Indratu Gladiator> on the other, the former spawning a <Elite Bakarma Captain> (550p) when killed. Their spawn points change between each other with every run.
Another two of these will be further in; one will be in a small corner on the right side, while the other will be on the stone platform, in its own segment to the left. As guards advance to fight the group of Balaur un the way, the player may choose to either ignore them (due to not giving points for a rank) or kill them (for the XP).

Memory Spot
On the stone platform, acting as the entrance to the bridge, players will find the Archdaeva transformed into an avatar and fighting Balaur with the respective type as the transformation. If the player goes near that spot, they will disappear and be ambushed by four <Minions of OblivionMinion of Oblivion> of the same type as the previous mobs. Unless the player dies or the monsters are defeated (each rewarding 250p when killed), the player will be confined to the barriers which appear when these Oblivion servants spawn. Even though they can be easily slain with the ![]() <Avatar of Fire>, it is suggested to use the appropriate counter.
<Avatar of Fire>, it is suggested to use the appropriate counter.
The first <Special Forces Commander Gegares> will be found on the right side of the stone platform. These mobs are the main interest in the instance, offering great amounts of XP. They only auto-attack, but their HP pool is considerably bigger than other mobs. As they will have a random type assigned to them, players must choose the respective element to finish them of fast enough.

Bridge view
Pressing forward through the bridge, three packs of Balaur will appear, getting bigger as the player moves on. They will either be ![]() Warrior Type or
Warrior Type or ![]() Special Type, with the former being more manageable.
Special Type, with the former being more manageable. ![]() Warrior Type can be dealt with
Warrior Type can be dealt with ![]() <Avatar of Wind>, kiting them around and damage them with
<Avatar of Wind>, kiting them around and damage them with ![]() <Field of Lightning>. Meanwhile
<Field of Lightning>. Meanwhile ![]() Special Type with have to use
Special Type with have to use ![]() <Avatar of Wind>, using
<Avatar of Wind>, using ![]() <Wave of Bitter Cold> and
<Wave of Bitter Cold> and ![]() <Icewind Gale>, focusing Ranger mobs first. If the player is low on HP, they may spam
<Icewind Gale>, focusing Ranger mobs first. If the player is low on HP, they may spam ![]() <Healing Rain> on them in order to recover.
<Healing Rain> on them in order to recover.
Passed the bridge, the way into Orkia Fortress had collapsed, thus the player must find an alternative way. The player may choose to ignore the fighting Balaur. However, up the dirt ramp to the left, Balaur will suddenly appear blocking the path. These will either be ![]() Warrior Type,
Warrior Type, ![]() Special Type or a single <Elite Bakarma Captain>. This spot is linked with the previous section in such way that types will not repeat. As such, if players encountered
Special Type or a single <Elite Bakarma Captain>. This spot is linked with the previous section in such way that types will not repeat. As such, if players encountered ![]() Warrior Type mobs first, this section will only contain either
Warrior Type mobs first, this section will only contain either ![]() Special Type mobs or the <Elite Bakarma Captain>. Both of these spots are linked to a third one further in.
Special Type mobs or the <Elite Bakarma Captain>. Both of these spots are linked to a third one further in.
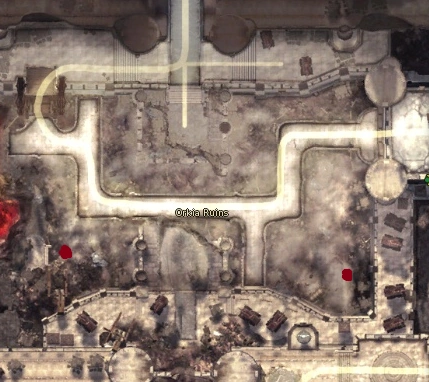
With that segment done, yet another Balaur group will be seen, but with varying types, which can be easily taken care of with the ![]() <Avatar of Fire>. The player will now enter Orkia Ruins, activating the first Teleport Stone, allowing the player to be teleported here in case of death.
<Avatar of Fire>. The player will now enter Orkia Ruins, activating the first Teleport Stone, allowing the player to be teleported here in case of death.
Continuing with the run, they will encounter the Archdaeva again. <Minions of OblivionMinion of Oblivion> will appear again, but five instead this time. The following segment will contain three Balaur fighting guards, one of them rewarding points. The third linked spot will also be further in, and what mobs spawn will be determined by what the other spots had held. If the first one spawned ![]() Warrior Type and the second one
Warrior Type and the second one ![]() Special Type, the third one will be the <Elite Bakarma Captain>. Additionally, the second <Special Forces Commander Gegares> can be found on the cornered platform next to the stairs.
Special Type, the third one will be the <Elite Bakarma Captain>. Additionally, the second <Special Forces Commander Gegares> can be found on the cornered platform next to the stairs.
The stairs will descend above a pit of lava. Each corner of the stairs will hold five Balaur mobs. The type is linked with another spot in Orkia Fortress. These will either be ![]() Mage Type or
Mage Type or ![]() Assassin Type. If
Assassin Type. If ![]() Mage Type, it will be enough to use
Mage Type, it will be enough to use ![]() <Avatar of Fire>, leaping towards them with
<Avatar of Fire>, leaping towards them with ![]() <Rush of Flames>, fearing them with
<Rush of Flames>, fearing them with ![]() <Horrific Blaze> and finish them off with
<Horrific Blaze> and finish them off with ![]() <Fan of Flames>. If
<Fan of Flames>. If ![]() Assassin Type, it is only needed to use
Assassin Type, it is only needed to use ![]() <Powerful Leap> and
<Powerful Leap> and ![]() <Ground Smash>. There being three groups of Balaur, the third one can be found passed the exit, on a lower platform. To get back up from there, players may extend their wings in the center and be lifted by the upstream, gliding towards the exit.
<Ground Smash>. There being three groups of Balaur, the third one can be found passed the exit, on a lower platform. To get back up from there, players may extend their wings in the center and be lifted by the upstream, gliding towards the exit.

After a narrow corridor, players will access the courtyard of Orkia Fortress, activating the second Teleport Stone. On opposite ends of the yard, players will encounter another <Recuperating Bakarma Gladiator> and a <Recuperating Indratu Gladiator>, one will be on the corner to the left of the Teleport Stone, while the other to the left passed the horde of mobs. Just like the previous occasion, their spawn points may be exchanged with every run.
As soon as the player enters the section, Atreian guards will rush through the main path and be ambushed by Balaur. This spot will be linked with the one from the stairs, meaning if the previous one was composed of ![]() Assassin Type, this one will contain
Assassin Type, this one will contain ![]() Mage Type. If the
Mage Type. If the ![]() Mage Type are encountered, it is recommended to let the guards tackle them and attack from the sides. While with
Mage Type are encountered, it is recommended to let the guards tackle them and attack from the sides. While with ![]() Assassin Type, players may simply use the aforementioned combo with
Assassin Type, players may simply use the aforementioned combo with ![]() <Powerful Leap> and
<Powerful Leap> and ![]() <Ground Smash>.
<Ground Smash>.
The following part will be composed of a huge horde of Balaur fighting Daevas. It is beneficial to clear this whole patch for the XP, or only sticking to the ones which reward points. In order to progress, players must use the elevator on the wall of the fortress. It may obly be unlocked by defeating the <Elite Bakarma Captain> which spawns as the player approaches. Up the lift, few mobs will be seen, each rewarding points.
Two balconies will be able to be seen, one holding a <Recuperating Bakarma Gladiator>, which will logically spawn a <Elite Bakarma Captain> when defeated. On the other, the third and last <Special Forces Commander Gegares> will be found. To press on into the instance however, players must go through the main hallway, blocked by a large group of Balaur of two random types. It is best to stick to the ![]() <Avatar of Fire> regardless. If
<Avatar of Fire> regardless. If ![]() Mage Type are encountered, it is best to target them first, or any Ranger-like
Mage Type are encountered, it is best to target them first, or any Ranger-like ![]() Special Type.
Special Type.
Provided the player has issues with this section, they may rush forward into Orkia Spire, activating the last Teleport Stone, and skipping the walk from the last checkpoint in case of death. The player may also lure ranged mobs to themselves by hiding behind the walls, forcing them to run towards them.
Up the stairs of Orkia Spire, the final section with the <Minions of OblivionMinion of Oblivion> will be fought, this time with six instead. If the player succeeds, the corridor on the back will lead to the Distorted Memory Seal, where the <Shadow of Oblivion> can be challenged.
Shadow of Oblivion
Fighting the <Shadow of Oblivion> is generally considered to be the most challenging part of the instance due to special mechanics. As soon as the player steps in the entrance pathway is sealed off, leaving a circular platform as the arena. When the <Shadow of Oblivion> is defeated, the timer will end, assigning the player a rank. The boss can be attempted as many times as the user desires within the time limit.
The boss fight consists of three phases. At the start (first phase) the boss will be in his default form (no type), only using ![]() <Horizontal Slash> and
<Horizontal Slash> and ![]() <Oblivion Strike> if the player's DPS is low. Upon hitting the ~75% health threshold the boss will cast
<Oblivion Strike> if the player's DPS is low. Upon hitting the ~75% health threshold the boss will cast ![]() <Oblivion> and change into one of the four types below, resetting its HP and starting the second phase. Finally, upon hitting the ~50% health threshold in this form, the boss will cast
<Oblivion> and change into one of the four types below, resetting its HP and starting the second phase. Finally, upon hitting the ~50% health threshold in this form, the boss will cast ![]() <Oblivion> and transform into another type one more time, marking the start of the third and final phase. This time the player must fully defeat the boss, depleting its HP.
<Oblivion> and transform into another type one more time, marking the start of the third and final phase. This time the player must fully defeat the boss, depleting its HP.
Tip: ![]() <Oblivion> can be countered by cancelling your Archdaeva transformation when the boss is about to change forms and using
<Oblivion> can be countered by cancelling your Archdaeva transformation when the boss is about to change forms and using ![]() <Remove Shock I>.
<Remove Shock I>.
- Type I: Assassin Type
Countered by: all.
- Pre-transformation quote: "Your fate shall be tested with my sharp dirk!"
- Dialogue quote: "The sting of my blade awaits. Gleaming dirk, bring my foe into Oblivion!"
- Weapon: Daggers
The easiest type. Using the ![]() <Avatar of Earth> is the most effective strategy (though it may be completed with any transformation). For maximum damage, the player must place themselves below the <Shadow of Oblivion> and spam
<Avatar of Earth> is the most effective strategy (though it may be completed with any transformation). For maximum damage, the player must place themselves below the <Shadow of Oblivion> and spam ![]() <Ground Smash>. While in this form the boss will stick to using
<Ground Smash>. While in this form the boss will stick to using ![]() <Dirk Chop>, a single target attack.
<Dirk Chop>, a single target attack.
Additionally, it will use ![]() <Shadow Move> to enter hide state and move to a random spot of the platform, following which it will cast
<Shadow Move> to enter hide state and move to a random spot of the platform, following which it will cast ![]() <Oblivion Dirk>. This can be easily countered by moving to and staying close to the boss once he re-appears from Hide.
<Oblivion Dirk>. This can be easily countered by moving to and staying close to the boss once he re-appears from Hide.
- Type II: Special Type
- Pre-transformation quote: "Your fate shall be tested with my mace of judgment!"
- Dialogue quote: "The weight of my judgement shall crush you. Judgement falls, bringing the Mace of Oblivion down onto you."
- Weapon: Mace and shield
While easy, it is a must to make use of the ![]() <Avatar of Water>. Across the fight the <Shadow of Oblivion> will cast
<Avatar of Water>. Across the fight the <Shadow of Oblivion> will cast ![]() <Pulverize>, which is followed by
<Pulverize>, which is followed by ![]() <Contaminated Memory> after some seconds. This skill will put a heavy hitting DoT on the player, and should be removed by using
<Contaminated Memory> after some seconds. This skill will put a heavy hitting DoT on the player, and should be removed by using ![]() <Healing Rain> as soon as possible.
<Healing Rain> as soon as possible.
Its most dangerous ability is ![]() <Oblivion Wave>. This cone-shaped frontal AoE is casted twice in a row; the first one inflicting few damage, but the second one will almost instantly kill the player if hit. The only way to avoid it is by running behind the boss. The skill can be predicted, as it will always and only happen around 3 seconds after
<Oblivion Wave>. This cone-shaped frontal AoE is casted twice in a row; the first one inflicting few damage, but the second one will almost instantly kill the player if hit. The only way to avoid it is by running behind the boss. The skill can be predicted, as it will always and only happen around 3 seconds after ![]() <Contaminated Memory> (2 auto attacks from the boss).
<Contaminated Memory> (2 auto attacks from the boss).
- Type III: Warrior Type
- Pre-transformation quote: "Your fate shall be tested with my great spear!"
- Dialogue quote: "Your fate shall be tested. Spear of Oblivion, I deliver this intruder onto you!"
- Weapon: Spear
While not overly difficult, the fight is lengthy and often interrupted. This fight can the performed in two ways: with the ![]() <Avatar of Fire>, being the easy strategy with slightly less damage or the
<Avatar of Fire>, being the easy strategy with slightly less damage or the ![]() <Avatar of Wind>, which is slightly more risky but yields higher damage. The boss' skill set will include
<Avatar of Wind>, which is slightly more risky but yields higher damage. The boss' skill set will include ![]() <Oblivion Spear> (an instant multi-cast attack which will inflict damage on a spot) and
<Oblivion Spear> (an instant multi-cast attack which will inflict damage on a spot) and ![]() <Strike> (a single target attack).
<Strike> (a single target attack).
The most threatening however feature is ![]() <Summon Shadow>, which will summon two Shadow of Oblivion Pieces on the field. These adds which will auto attack in melee range and deal huge damage. If left unattended, the player will die within few seconds. Using the
<Summon Shadow>, which will summon two Shadow of Oblivion Pieces on the field. These adds which will auto attack in melee range and deal huge damage. If left unattended, the player will die within few seconds. Using the ![]() <Avatar of Fire>, the player can drag the <Shadow of Oblivion> to a side and place itself between the wall and the boss itself. Whenever
<Avatar of Fire>, the player can drag the <Shadow of Oblivion> to a side and place itself between the wall and the boss itself. Whenever ![]() <Summon Shadow> is used, using
<Summon Shadow> is used, using ![]() <Horrific Blaze> will deal with adds, and can be finished off with
<Horrific Blaze> will deal with adds, and can be finished off with ![]() <Fan of Flames>. If using the
<Fan of Flames>. If using the ![]() <Avatar of Wind>, one idea is to tank the boss on either end of the room (north or south). When it is summoning its adds quickly cancel
<Avatar of Wind>, one idea is to tank the boss on either end of the room (north or south). When it is summoning its adds quickly cancel ![]() <Storm Surge>, move straight to the opposite end of the room, re-cast it and dispatch of the adds. This way the player can kill them before they come in range and return to fighting the boss faster.
<Storm Surge>, move straight to the opposite end of the room, re-cast it and dispatch of the adds. This way the player can kill them before they come in range and return to fighting the boss faster.
- Type IV: Mage Type
- Pre-transformation quote: "Your fate shall be tested with my imperturbable wisdom!"
- Dialogue quote: "You cannot outwit me. In my wisdom I trust, I shall reveal the of Oblivion!"
- Weapon: Magic
The most difficult type. In this form the boss deals the highest damage and also has the largest skill set. For starters, it is highly recommended to keep the <Shadow of Oblivion> in the middle of the platform (move to either the north or south end to re-position him if he is not at the middle), and to fight him using the ![]() <Avatar of Fire>. During regular auto attacks the boss will use
<Avatar of Fire>. During regular auto attacks the boss will use ![]() <Magic Discharge>, but extra caution should be exerted once he starts his special rotation.
<Magic Discharge>, but extra caution should be exerted once he starts his special rotation.
The start of the mage type's special rotation is marked by the boss casting ![]() <Pull (skill)> and spawning four Shadow of Oblivion Pieces around it. One of them will begin to cast
<Pull (skill)> and spawning four Shadow of Oblivion Pieces around it. One of them will begin to cast ![]() <Reflect Magic> which, is completed, will inflict heavy damage on the player. Players can use TAB to quickly locate the add casting the skill (or look for the skill animation) and use
<Reflect Magic> which, is completed, will inflict heavy damage on the player. Players can use TAB to quickly locate the add casting the skill (or look for the skill animation) and use ![]() <Inferno's Embrace> on to cancel the cast.
<Inferno's Embrace> on to cancel the cast.
Shortly after this the boss will use ![]() <Pull (skill)> again, this time following up with Oblivion Explosion and
<Pull (skill)> again, this time following up with Oblivion Explosion and ![]() <Magic Power Explosion> (a long range AoE attack). If the player has been spamming
<Magic Power Explosion> (a long range AoE attack). If the player has been spamming ![]() <Inferno's Embrace> on the boss (or by using pots or scrolls) they should have enough health left to survive Oblivion Explosion, after which the fire transformation should be cancelled and re-cast immediately. Doing so will fully restore the player's health and allow them to survive
<Inferno's Embrace> on the boss (or by using pots or scrolls) they should have enough health left to survive Oblivion Explosion, after which the fire transformation should be cancelled and re-cast immediately. Doing so will fully restore the player's health and allow them to survive ![]() <Magic Power Explosion>. After this the boss will return to his auto-attacks.
<Magic Power Explosion>. After this the boss will return to his auto-attacks.
Quests
Both races receive one standalone campaign quest for the zone (automatically obtained at level 66), as well as a repeatable normal-grade quest each time the instance is entered. The latter awards a small amount of bonus experience if the player completes a number of objectives inside, and can be turned in through the Bounty feature.
- Elyos
- To the Fissure of Oblivion [?]
- Reminiscing [?]
- Asmodians
- Forgotten Memories [?]
- The Avatars [?]
Rewards
Rank
Depending on the time left and total points acquired upon defeating the <Shadow of Oblivion>, the player will be assigned a rank. Obtaining a D-rank or higher will reward ![]() <Frozen Marbles of MemoryFrozen Marble of Memory>, with higher ranks awarding increased amounts.
<Frozen Marbles of MemoryFrozen Marble of Memory>, with higher ranks awarding increased amounts.
| Rank | Time Left | Points | Rewards |
|---|---|---|---|
| S | 20 mins | 23,550 | |
| A | 18 mins | 21,200 | |
| B | 16 mins | 17,700 | |
| C | 10 mins | 14,100 | |
| D | 1 min | 9,400 | |
| F | - | - | None |
Exchanging
These marbles are used as tokens to acquire special items. They are turned in through NPCs in front of the instance's entrance; Rimia for Elyos, and Stolla for Asmodians.
| Item | Amount of Marbles |
|---|---|
| 12 | |
| 6 | |
| 30 | |
| 120 | |
| 120 | |
| File:Wing Feathers of Oblivion.gif Wing Feathers of Oblivion | 70 |
Extra
Additionally, by defeating any of the three <Special Forces Commander Gegares> across the instance, ![]() <Ancient Coin> bundles will be rewarded. Depending of the level of the player, they will reward a different bundle. The higher the level of the bundle, the more
<Ancient Coin> bundles will be rewarded. Depending of the level of the player, they will reward a different bundle. The higher the level of the bundle, the more ![]() <Ancient Coins> can be given out. The main reward from doing the Fissure of Oblivion, however, is the very high amount of experience players acquire from defeating these monsters.
<Ancient Coins> can be given out. The main reward from doing the Fissure of Oblivion, however, is the very high amount of experience players acquire from defeating these monsters.
Trivia
- Empyrean Lord Kaisinel can be seen fighting against a Dragon form Beritra inside.
- If the player decides to not help any NPCs to fight off the Balaur, they will eventually die against them. This mimics how crucial the involvement of the Archdaeva was to the events which took place.
- The different shapes of the <Shadow of Oblivion> could represent emotions or stances regarding the Archdaeva's actions during the peace talks.
- Assassin Type: Guilt/Repentance, acting as an executioner.
- Special Type: Justice for the Archdaeva's decisions.
- Warrior Type: Desire to keep his involvement in secrecy.
- Mage Type: Pride on having kept the secret.
- During the instance, when the player is ambushed by <Minions of OblivionMinion of Oblivion>, it represents how the character attempts to gain a memory about the Archdaeva, however this seeking is crippled by the <Shadow of Oblivion> sending his servants.
Template:Atreia Instance Navbox