This guide contains basics to help you enjoy Aion, and progress through levels and quests. Read on and learn what many players already know - where to get quests, what weapons and manastones are best for a certain class of player, and how to get groups when needed.
Game Basics
Binding to an Obelisk
As soon as possible, bind to an obelisk, which costs kinah. This becomes the resurrection point if defeated, and is the returning location when using ![]() <Return>. If defeated, pay the Soul Healer at the obelisk to remove the death debuff to reduce the time it lasts.
<Return>. If defeated, pay the Soul Healer at the obelisk to remove the death debuff to reduce the time it lasts.
Selecting Targets
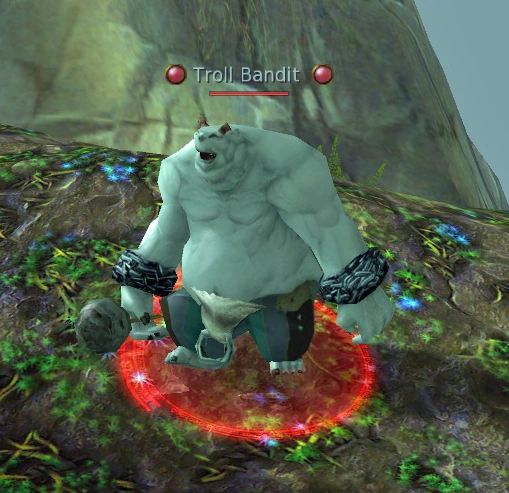
Clicking on an NPC will select it, allowing attack. Alternately, pressing <Tab> will cycle through nearby targets. A targeted hostile NPC will be highlighted on the screen with a red circle on the ground where they are, and the name will highlight as well. Friendly NPC's have a smaller, yellow circle at their feet.
Learning Skills
Skills are learned from skill manuals, or acquired through use of a stigma after level 20. Skill manuals can be purchased from Trainers in various locations. The starting villages have manuals up to level 9, then the major cities of Pandaemonium and Sanctum have two areas to purchase skill manuals. Quests will guide new players to both areas as they continue to level up. Some manuals are only available as drops, but can often be purchased from the Broker.
To learn a new skill, right-click the manual in your inventory. To add it to the skill bar, press <K> and drag the skill onto the desired spot on the skill bar. Locking the skill bar will prevent accidental removal of skills.
Unlocking the bar allows players to relocate skills as desired.
Passive skills will increase certain attributes, and do not need to be on a skill bar. It is probably helpful to put the <Loot> skill on the bar.
Resting
After a battle, both HP and MP will be decreased. Natural healing and mana regeneration will increase faster if resting. Hit the comma key to rest.
Titles
As certain quests are completed, players get a title as the reward. Each title will affect specific attributes if selected. Press
and chose the <Title> tab to see what the choices are. For a full listing of titles, and their effects, see Title.
Stigmas
At level 20, Daevas must complete a campaign quest that leads them to the appropriate Stigma Master. Asmodians must complete ![]() <No Escaping Destiny> [20], while Elyos need to do
<No Escaping Destiny> [20], while Elyos need to do ![]() <A Sliver of Darkness> [20]. Completing the quest unlocks two stigma slots. Players can unlock a new slot every 10 levels, and advanced stigma slots with specific quests.
<A Sliver of Darkness> [20]. Completing the quest unlocks two stigma slots. Players can unlock a new slot every 10 levels, and advanced stigma slots with specific quests.
At level 20, these are the stigmas that can be used:
| Class | Quest Reward Stigma | Purchased Stigma |
|---|---|---|
| Templar | File:Holy Shield I (stigma).gif Holy Shield I (stigma) | |
| Gladiator | File:Dual Weapon Mastery I (stigma).gif Dual Weapon Mastery I (stigma) | |
| Assassin | File:Flurry I (stigma).gif Flurry I (stigma) | |
| Ranger | File:Sleep Arrow I (stigma).gif Sleep Arrow I (stigma) | |
| Sorcerer | ||
| Spirit Master | File:Body Root I (stigma).gif Body Root I (stigma) | |
| Chanter | File:Healing Conduit I (stigma).gif Healing Conduit I (stigma) | |
| Cleric | File:Flash of Recovery I (stigma).gif Flash of Recovery I (stigma) |
.gif)
.gif)
.gif)
.gif)
.gif)
.gif)
.gif)
Questing
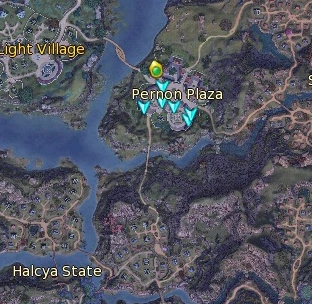
There are several different types of quests that will be encountered in the game. Campaign quests progress the game, but standard side quests offer kinah, items, XP and additional lore that makes the game more enjoyable. Completing quests is the fastest way to level a character. Pressing <J> will access the journal. Clicking on one of the top tabs opens that section of quests. Each will be listed by the area where it is acquired. Campaign quests have yellow markers, and standard quests are a medium blue. Key quests, which will lead to new areas or important progress points, are a different brighter blue. If there are events, those have a dark pink marker. Quests will appear on the map (click <M> to open the map).
Chat
There are a number of various chat channels to communicate with other players. Right- clicking on the tab will give the option to change the chat settings. Colors can be custom set, and can be reset to default if desired. After typing the correct command, hit <Enter> to open up the dialogue box to type the message. NOTE: Emotes can be seen by players of both factions, which can be important in hostile areas.
| Chat channel | Command to type | Additional Information |
|---|---|---|
| General | /s, /general | Can only be seen by all nearby players. Although opposite factions will not be able to decode the language, it will appear in their chat. |
| Shout | /y , /shout | Able to be seen locally, at a greater distance than /s. |
| Whisper | /w <character name> or /whisper <character name> | Only seen by the specified character. Hit <T> to reply to a whisper. Often called PM in chats. |
| Group | /p , /group, /party | Will only be seen by group members. |
| Alliance | /a , /force | Will only be seen by alliance members. |
| Legion | /l , /legion | Will only be seen by members of same legion. |
| Alert | /alert | Will be seen by members of same group, alliance or league. Often used in fort raids to direct attacks. |
| League | /league | Will only be seen by members of the league. |
| Region | /1 | Local. Can be seen by all same faction players within the same region. |
| Trade | /2 | Local. Can be seen by all same faction players within the same region. |
| LFG (Looking For Group) | /3 | Global. Seen by all same faction players. Enforces a 30 second delay between messages. |
| Class | /4 | Can only be seen by players of the same class. |
Changing Channels
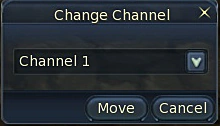
Areas where there are no rifts have more than one channel, and can be helpful to find groups or friends. Moving to a less crowded channel when killing quest mobs, for example, can be advantageous. To change channels, open the Menu (default: <F10>) and chose Change Channel from the Go to Channel sub-menu. A dialog box will open, chose the desired channel and click OK.
Fast Track Server
With the 3.1 Update, a new Fast-Track Server was added which offers a 100% XP boost up to level 50. This is accessible to characters from all existing servers, so that they can play together and receive benefits that help them level up quicker.
- Only characters up to level 50 can use the Fast-Track Server.
- The zones available are Ishalgen, Altgard, Morheim, and Beluslan in Asmodae, and Poeta, Verteron, Eltnen, and Heiron in Elysea. Additionally, you can only transfer to the Fast-Track Server from these zones.
- Most instances in these zones are available, except Dark Poeta.
- Go to <Menu> -> <Go to Channel> -> <Go to Fast-Track Server> to transfer to the new server.
- Once on the Fast-Track Server, you can transfer back at any time to your original server by selecting <Menu> -> <Go to Channel> -> <Go to Standard Server>.
Finding NPCs
If a quest requires a specific NPC or location, type /where [name] to locate it. Another option is to open the quest, and click the <Locate> button and it will display as an <X> on your map.
Another alternative is to open the map (open the map with the <M> key ) and chose the <Quest> tab on the upper left corner. Highlighting a quest will change to the region map and show a grey circle on the area needed for the quest. However, this will not work for some quests, particularly those within an instance.
Inventory and Managing Items
Inventory or cube space, can be accessed by pressing <I>. There are many types of items which can be stored in a cube, pet, warehouse, or legion storage. The first expansion for cube space can be purchased in the first village new players visit. For more information on Cube Expansion see Cube. The Account warehouse will store items for all characters on the same server on an account.
General items can be used by all classes, unless the item specifically identifies a restriction. Soulbound items can be traded prior to equipping them, and become soulbound as soon as they are equipped. Once bound, the item cannot be traded, stored in an account or legion warehouse, or sold to anyone other than an NPC. Once bound, the item cannot be traded, stored in an account or legion warehouse, or sold to anyone other than an NPC.
Other items may have specific limitations on their descriptions. They may be unable to be traded, or stored in some cases. Some cannot be sold or cannot be disenchanted. It is always a good idea to read the item description when in a group and rolling on items. Most groups use the "class appropriate" rule to determine who should roll on items.
You can display items in your inventory in chat by holding Ctrl and right-clicking on the item in your inventory. This can be used to link drops or advertise to potential buyers!
Class Specific Items
There are many different playstyles, and many different kinds of gear. Take a look at the chart below for preferred types of equipment based on each class's recommended role.
| Class | Preferred Gear | Choices of Armor | Choices of Weapons |
|---|---|---|---|
| Templar | Plate / Sword / Shield | Plate / Chain / Leather / Cloth | Sword / Mace / Greatsword |
| Gladiator | Plate/Polearm | Plate / Chain / Leather / Cloth | Dagger / Sword / Mace / Greatsword / Polearm / Bow |
| Assassin | Leather / Dagger | Leather / Cloth | Dagger / Sword / Bow |
| Ranger | Leather / Bow | Leather / Cloth | Bow / Dagger / Sword |
| Sorcerer | Cloth / Orb | Cloth | Orb / Spellbook |
| Spiritmaster | Cloth / Spellbook | Cloth | Orb / Spellbook |
| Chanter | Chain / Staff | Chain / Cloth / Leather | Mace / Staff |
| Cleric | Chain / Mace / Shield | Chain / Cloth / Leather | Mace / Staff |
Item Stats
Abilities can be boosted by choosing equipment, armor, accessories and manastones which are of more valuable for your class.
- Melee classes which include Templar, Gladiator, Ranger, Assassin, and Chanter benefit from Physical Attack, Evasion, HP
- Magic classes which include Sorcerer, Spiritmaster, Cleric benefit from Magic Boost, Magical Accuracy, and HP
Item Rarity
Rarity refers to a classification system used for items. The more difficult to obtain an item, and the higher it's quality, the higher the rarity.
| Rarity | Color | Description |
|---|---|---|
| Junk | Gray | Of little value these items are sold to the merchant. |
| Common | White | Common items can be found throughout Atreia. Vendors may carry some of these items. Usually sold to merchant. |
| Superior | Green | Superior items are uncommon. Superior items have better attributes than common items. These may be sold by Contribution vendors. Use if better attributes, otherwise sell to merchant. |
| Heroic | Blue | Heroic items are hard to find! Contribution vendors may sell heroic items, but they are a bit expensive. These are often very good to equip, and if not, sell well on the Broker. |
| Fabled | Gold | Fabled items are extremely rare and the most expensive to purchase from Contribution vendors. They have high attribute bonuses. Excellent to equip, and sell for good Kinah on the Broker. |
| Eternal | Orange | The highest and most rare items, they can be found by defeating bosses who carry these items. Some are class specific. Excellent to equip. |
Manastones for Class
Each class will benefit more from specific manastones, until reaching max level when players may have multiple armor sets for specific attributes.
| Class | Suggested Manastones |
|---|---|
| Templar | Block / Attack+ CritStrike / Parry |
| Gladiator | Attack+CritStrike / ResistMagic / HP |
| Assassin | CritStrike + Attack / ResistMagic / Evasion |
| Ranger | CritStrike / CritStrike + Attack |
| Sorcerer | MagicBoost / Magic Acc / HP |
| Spiritmaster | MagicBoost + HP / Magical Acc |
| Chanter | CritStrike + Attack / ResistMagic |
| Cleric | MagicBoost / ResistMagic |
Player Groups
Some areas and quests will require grouping with others to accomplish a task, usually because the mobs are elite in the area. There are a few ways to join a group.
- Right click a nearby player, and select <Invite to Group> from the menu. This opens a dialogue box on the player's screen for them to accept the invitation.
- Type /invite [Name] and hit enter.
- Press Shift+V and select a group from the list. Chose <Apply to Group> and hit enter. The group leader will get a dialogue box and can choose to accept or reject your request.
Working within Groups
Each class of player has an expected role with in a group, and working effectively together can be the difference between success and wiping. A well balanced group will include a good combination of classes.
| Role | Classes | Rationale |
|---|---|---|
| Tank | Gladiator, Templar | Gladiators and templars have high defense and lots of HP, great for drawing aggro (being targeted by monsters) and protecting the party. With plate armor, they can withstand damage the best. |
| Healer | Cleric, Chanter | Clerics and chanters can heal party members while staying out of aggro. Clerics have group heals and more healing skills, however chanters make excellent second healers in a group. |
| Damage (DPS) | Assassin, Gladiator, Ranger, Sorcerer, Spiritmaster | These classes focus on physical and magical attacks to deal high damage-per-second to enemies. A combination of ranged and melee dps is usually very effective. |
| Buffs | Chanter, Cleric | Chanters can use powerful mantras to buff their teammates, increasing group members' defense, damage, speed, and more! Cleric have some buff skills as well. |
| Debuff | Spiritmaster | Spiritmasters can strip enemies of buffs, making them more vulnerable to attack and dealing damage. |
| Crowd Control (CC) | Sorcerer, Spiritmaster, Ranger | These classes have skills that allow them to restrict an enemy's ability to attack. |
Using Brands
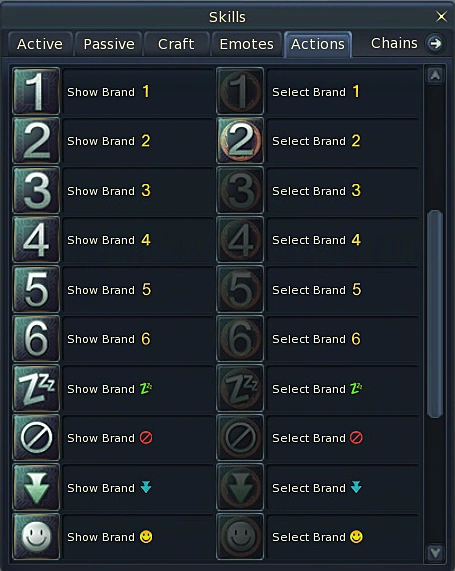
Brands are icons that can be used to mark targets to coordinate the group. The Group leader can select a target, then place brands that appear above that target's head, visible to any group member.
- Zzzz lets the group know to immobilize that monster
- 1, 2, 3, etc., designates the order to attack monsters
- The Skull brand means attack this mob
Brands can also be used in an Alliance to mark targets, but can only be seen by alliance members.