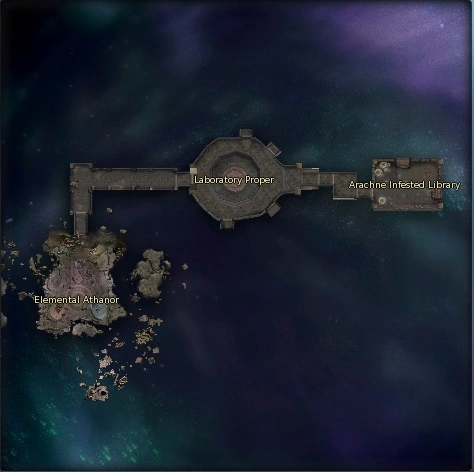
Theobomos Test Chamber map
Theobomos Test Chamber (TTC), also known as Elemental Lord's Laboratory, is a group instance for players of level 66 and above. It is only accessible on Tuesdays, Thursdays and Saturdays from the Ellosim Garden Sentry Post in Iluma for Elyos and the Morninglight Scout Post in Norsvold for Asmodians. Its an extra-dimensional research center crawling with ferocious creatures and a merciless overlord.
Being the lowest tier of difficulty out of Archdaeva instances, this one and Adma's Fall are ran for XP in the lower levels and basic Archdaeva gear.
Backstory
As the access to the regions at the base of the Tower of Eternity is gained, several fragments of the Tower were found, laying on the ground, due to the Cataclysm. However, much like artifacts, they remain active, altering their surroundings. Specific ones are powerful enough to distort space and create corridors leading to neglected places.
One of those facilities was the abandoned test chamber, which holds the forceful presence of the <Desecrated Ifrit>, an ancient elemental spirit which was corrupted by the strong Aetheric energy expelled from an artifact which she holds and controls. As a result, Daevas have made their objective to infiltrate the chamber and put an end to that threat. Nonetheless, the unstable rifts in Iluma and Norsvold are still completely unpredictable to them.
Walkthrough
Players will zone in to the Arachne Infected Library, a small room swarmed with <Test Subject Hatchlings> and <Test Subject Sheluks>. While easy to take out, their skillset includes ![]() <Web>, which will paralyze a target. In order to access the following room, the group must exterminate the <Blood-swollen Arachne>, a slightly more powerful version of the mobs in the section.
<Web>, which will paralyze a target. In order to access the following room, the group must exterminate the <Blood-swollen Arachne>, a slightly more powerful version of the mobs in the section.
With the way to the Laboratory Proper open, players will be greeted by new more resilient enemies, including <Gargoyle Kirrus>, <Living Statue Golems> and <Aether Encrusted Titans>. It is crucial to first clear the center of the room before engaging the named mob in the middle, which will unlock the way into the following section.
This key monster being <Galateia the Living>, it is crucial to put her into a silenced state and slaying her before she casts the ![]() <Deep Wound> or
<Deep Wound> or ![]() <Mental Tremor> skills. These debuffs will affect the whole group for 1 minute and cannot be removed.
<Mental Tremor> skills. These debuffs will affect the whole group for 1 minute and cannot be removed. ![]() <Deep Wound> will blind, reduce the effects of healing and deal damage over time, while
<Deep Wound> will blind, reduce the effects of healing and deal damage over time, while ![]() <Mental Tremor> will reduce magic boost, increase casting times, reduce the effects of healing and deal damage over time. With <Galateia the Living> killed, the way to the final section of the instance will be open. Additionally, she may sometimes drop a
<Mental Tremor> will reduce magic boost, increase casting times, reduce the effects of healing and deal damage over time. With <Galateia the Living> killed, the way to the final section of the instance will be open. Additionally, she may sometimes drop a ![]() <Blood-Sealed Treasure Box Key>, which is used later on in the run.
<Blood-Sealed Treasure Box Key>, which is used later on in the run.
Connecting to the Elemental Athanor, a small corridor ends up in an interactive door which will teleport the group to the boss room. Inside it, the group will confront the <Desecrated Ifrit>, the final boss. Throughout the battle, it is crucial to remain at zero metres from her. This is because of a skill she casts very oftenly; ![]() <Flame Smash>, dealing damage to all nearby targets. However, damage is distributed among the targets affected, meaning standing alone will cause players to suffer more damage from it. She will also cast
<Flame Smash>, dealing damage to all nearby targets. However, damage is distributed among the targets affected, meaning standing alone will cause players to suffer more damage from it. She will also cast ![]() <Elemental Shock> (dealing damage and reducing nearby targets' movement speed),
<Elemental Shock> (dealing damage and reducing nearby targets' movement speed), ![]() <Screaming Stone> (a hard-hitting AoE) and
<Screaming Stone> (a hard-hitting AoE) and ![]() <Flame Outburst> (a strong damage over time debuff which cannot be removed).
<Flame Outburst> (a strong damage over time debuff which cannot be removed).
Further into the fight, <Desecrated Ifrit> will begin using ![]() <Summon Elemental>, summoning two spirits on opposite corners of the room. By themselves, they will blind, silence, stun and deal damage on players. However, after a certain amount of time, the boss will order the spirits to explode by casting
<Summon Elemental>, summoning two spirits on opposite corners of the room. By themselves, they will blind, silence, stun and deal damage on players. However, after a certain amount of time, the boss will order the spirits to explode by casting ![]() <Spirit Explosion>, dealing huge amounts of damage on targets in the room. Due to both of those reasons, it is best to get rid of those additional enemies as soon as possible.
<Spirit Explosion>, dealing huge amounts of damage on targets in the room. Due to both of those reasons, it is best to get rid of those additional enemies as soon as possible.
![]() <Screaming Stone> will also be used five times in a row sometimes during the fight. To avoid damage, group members may run away from the <Desecrated Ifrit>. Stronger groups may take the damage and proceed focusing on the boss.
<Screaming Stone> will also be used five times in a row sometimes during the fight. To avoid damage, group members may run away from the <Desecrated Ifrit>. Stronger groups may take the damage and proceed focusing on the boss.
However, the boss' most dangerous skill is Absolute Order: Destruction and ![]() <Element Lord's Lance>. The former skill will cause a random player to be bound and silenced, and be targeted by the boss. She will follow up this with
<Element Lord's Lance>. The former skill will cause a random player to be bound and silenced, and be targeted by the boss. She will follow up this with ![]() <Element Lord's Lance> which will inflict heavy damage on players around the target (while the group member affected by Absolute Order: Destruction will be shielded against it). This can be avoided by running away from the group before
<Element Lord's Lance> which will inflict heavy damage on players around the target (while the group member affected by Absolute Order: Destruction will be shielded against it). This can be avoided by running away from the group before ![]() <Element Lord's Lance> is performed.
<Element Lord's Lance> is performed.
Once the <Desecrated Ifrit>, they may loot its corpse for a random piece of the Adma mythic PvE set. Each member will get a chest with eternal gear, as well as a Dimension Stone Bundle and Supplements.
Additionally, a <Blood-sealed Coffer> will spawn, which can be opened by using the ![]() <Blood-Sealed Treasure Box Key> dropped from <Galateia the Living>. The chest will reward either a
<Blood-Sealed Treasure Box Key> dropped from <Galateia the Living>. The chest will reward either a ![]() <Galateia's Dress> or
<Galateia's Dress> or ![]() <Galateia's Hairpin>, both appearances items. Once done, players may exit from the rift that spawns in the middle of the room.
<Galateia's Hairpin>, both appearances items. Once done, players may exit from the rift that spawns in the middle of the room.
Quests
- Elyos
 [Instance/Group] Another Fragment, Another Fight [?]
- [Instance/Group] Return to the Test Chamber [?]
- Asmodian
- [Instance/Group] Another Doorway... [?]
- [Instance/Group] Insistent Ifrit [?]
- Bobonerk's Agency
These are high XP rewarding quests (90m XP) which are given out by Bobonerk, only requiring to kill the last boss. By completing the quest associated with this instance, the one related to Drakenseer's Lair will be unlocked. These are unlocked by completing the quest related to Adma's Fall.
- [Instanced Dungeon/Group] Request 2: Theobomos Test Chamber [?]
- [Instanced Dungeon/Group] Repeated Request: Theobomos Test Chamber [?]
Rewards
- Desecrated Ifrit
- Laboratory mythic weapons and armor (rolled on)
- <Theobomos's Weapon Box>
- Chaos Lord's eternal weapons
- <Theobomos's Armor Box>
- Chaos Lord's eternal armor
- <Chaotic Dimension Stone Bundle>
- <Tempering Solutions>
- <Essence Core Solutions>
- <Stigma Sack>
- Key Mobs
- Blood-sealed Coffer
- General
- <Omega Enchantment Stones>
- Archdaeva Manastones
- <Ancient Coins> (associated quests)
- <Lesser Supplements (Mythic)> (associated quests)
Bandits of Greed
Bandits of Greed will sometimes appear in this instance. They spawn in the Arachne Infected Library, the starting room, in front of the door next to the <Blood-swollen Arachne>. They disappear after some minutes if they are not attacked. Once attacked, it will attempt to run off and despawn. If killed, they will drop a bundle for each group memmber, which will be automatically opened when picked up.
Trivia
- The ambient is identical to the one from Theobomos Lab.
- The instance deals identical mobs and set up to the special version of the Theobomos Lab instance only available in the "Master Server" available only on certain regions.
Template:Atreia Instance Navbox